If you’re looking for a different online back up or storage provider, then be sure to check out our comprehensive guide to the best cloud storage services 2017.
How can I disable OneDrive?
If you want to stop using the OneDrive service, but leave the app on your PC or laptop in case you change your mind later, then the best option is to simply disable it. This only takes a couple of minutes, and you start by looking in the Notification area at the right-hand end of the Taskbar. When you see the OneDrive icon, right-click on it to open a menu from which you need to select Settings.
A window will appear. Make sure the Account tab is selected, then click the Unlink this PC option, followed by Unlink this account.
Now OneDrive will stop syncing anything from your PC to the cloud. Any data you already have stored on the OneDrive servers will still be there, but new items will only be stored on your PC’s hard drive.
How can I remove OneDrive?
If you want to go a step further and remove any signs of OneDrive from your PC then you’ll need to uninstall or hide the app. OneDrive is an integral part of Windows 10, so you’ll find you’re not allowed to uninstall it, but there are options still open to you. To see if you can remove OneDrive, open the Start Menu then right click on the OneDrive application. Select Uninstall, then you’ll be taken to the Uninstall or Change a program menu. Here, right-click on OneDrive, then choose Uninstall. As we say, this option may not be available, depending on which version of Windows you have.
Now confirm that this program can make changes to your system, and Windows will remove OneDrive from your PC.
How can I hide OneDrive in Windows 10?
If you don’t have the option uninstall OneDrive, you can still prevent it from syncing any data or appearing in your menus. To do this, go to the Notification area in the Taskbar, right click on the OneDrive icon, and choose Settings. Make sure the Settings tab is selected, then uncheck all the boxes in the General section.
Next, select the Auto Save tab and change the Documents and Pictures setting to This PC only, then uncheck any other boxes on that tab.
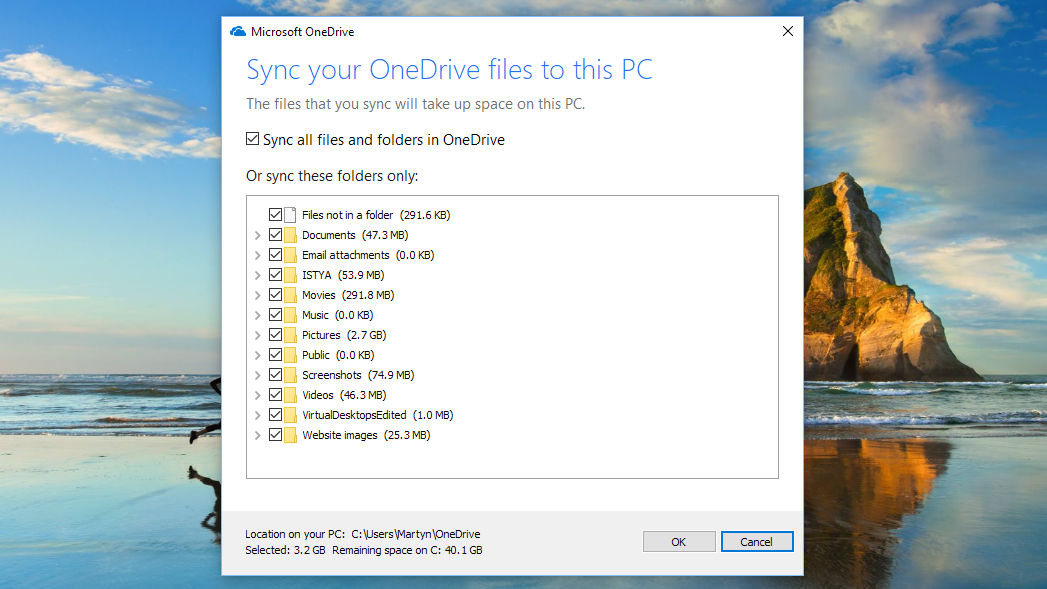
Now go to the Account tab and click on the Choose folders button. This opens a window with a long list of all the various folders that OneDrive is currently backing up to the cloud.
You can go through and manually untick each one, but the quickest way is to click on the Sync all files and folders in OneDrive box at the top of the list. This should remove all of them at once. If you only had a few ticked to begin with, then click the box twice: once to select everything, and then the second time to clear everything. You’ll see a warning message appear, as you’re about to remove all of these files from your hard drive, but remember they’ll still be available online at OneDrive.com. Click OK to confirm the changes. With all of these settings now adjusted you can click the OK button at the bottom of the Settings box to put them into action. There are just a few little bits of tidying up left to do now. Return to the Notification area once more, right click on the OneDrive icon, select Settings, then go to the Account tab. This time click on the Unlink OneDrive option, and then close the Welcome to OneDrive window that appears. To remove the icon in File Explorer you’ll need to click on the File Explorer icon itself, and then right click on OneDrive. From the menu that appears choose Properties, make sure the General tab is selected, then in the Attributes section tick the box marked Hidden.
Finally, go back to the Notifications area, right click OneDrive, and click Exit. That’s it. OneDrive will now remain dormant on your system until such a time as you choose to raise it from its slumber.
Disabling and hiding OneDrive in Windows 8.1
Things are a little different on Windows 8.1. First off, you can’t uninstall OneDrive at all, but you can disable the service. Begin by opening the Start menu, right-clicking on the OneDrive icon, then selecting Unpin from Start. Next you’ll need to open PC Settings>OneDrive, and turn off all the various syncing and storage options. In the File Storage tab turn off Save documents to OneDrive by default. Then go to the Camera roll tab and choose Don’t upload photos, followed by disabling the Automatically upload videos to OneDrive option. Next, open the Sync settings tab, look for Sync settings with OneDrive, then turn off Sync your settings on this PC. Lastly, go to the Metered Connections tab and make sure that everything is turned off. With all of the sync settings now disabled, the final step is to hide the OneDrive folder in File Explorer. To do this, open File Explorer, right-click OneDrive, and select Properties. On the General tab you’ll see a section marked Attributes. Tick the Hidden box, and when you return to File Explorer you should see that OneDrive has disappeared.
Uninstalling OneDrive on Windows 7
Removing OneDrive from Windows 7 is very simple. Click on the Start button, then type in the search terms Programs. From the list of results that you get, select Programs and Features, then choose OneDrive. You’ll be presented with the option to uninstall the app. Select this, enter your administrator password, and Windows will remove OneDrive from your machine. So, there you have it. A few ways to remove OneDrive from your Windows PC. Just be sure to backup your files somewhere, as they’re all too easy to lose, and almost impossible to replace. Martyn has been involved with tech ever since the arrival of his ZX Spectrum back in the early 80s. He covers iOS, Android, Windows and macOS, writing tutorials, buying guides and reviews for Macworld and its sister site Tech Advisor.