UPDATE 18/11/14: The OTA update for the Nexus 5 is still nowhere to be seen, making the process below the only way you can get Lollipop on your Nexus 5 currently. Asus has just announced it has begun rolling out Lollipop for Nexus 7 (both 2012 and 2013 Wi-Fi models) so owners of these devices may want to wait a few days for the over-the-air update rather than wiping their tablets using the method below. If you have an LTE/3G Nexus 7, the update will be available “from around the beginning of December”. Good news, though: Google has at last posted the final Lollipop factory images for the Nexus 4, 5, 7 (Wi-Fi ONLY) or 10, you can download it and use the guide below to install it. You’ll need to do this even if you’re already running an Android L Preview image. Make sure you download the correct image file for your device from this Google page. Don’t download images from other websites which may contain malware. DON’T FORGET that this method will ERASE your device and you will lose ALL your data (if it isn’t backed up). This is why it’s best for many people to wait for the over-the-air update as that will upgrade to Lollipop without removing all your data. See also: How to fix Wi-Fi problems with Android Lollipop So, you have been warned. Just make sure you have backed up everything that you can’t afford to lose before you install Android Lollipop, since the process will wipe your device (we cannot repeat that enough). We’ll explain step by step how to install the preview on a Nexus 5, using Windows 7 or 8. The process is effectively the same on the 2013 Nexus 7 (Wi-Fi only), Nexus 4 and Nexus 10.
How to install Android Lollipop right now
NOTE: If you’ve already installed a preview of Android using this tutorial, skip to step 2. Step 1. Download the minimal 2MB installer from this XDA thread this XDA thread which includes the Android ADB and fastboot tools. You need these to install the Android L image, and this is the quickest and easiest way to install the tools without downloading the entire Android SDK, which is huge and contains stuff you don’t need to get Android L. Follow the instructions (don’t change the installation path when asked where to install it) and you should end up with a command prompt window:
Step 2. Download the appropriate file for your device from Google’s factory images page You will also need a utility such as 7-zip which can extract the files from the .tgz file. NOTE: We had to change the file extension of the downloaded file from .tar to .tgz before the .tar file within the .tgz could be extracted. Now that you’ve extracted the .tar file from the .tgz file, extract the contents of the .tar file (shown below) to a temporary location, such as the desktop. They should be extracted in a single folder called ‘hammerhead-lrx21o’.
Note you do NOT need to unzip the zip file which is highlighted. Leave this as it is Now, copy the contents of the hammerhead-lrx21lo folder to your Minimal ADB and Fastboot folder, which should be c:Program Files (x86)Minimal ADB and Fastboot.. You will need to overwrite some files if you haven’t cleared out an older Android image from the folder. Step 3. On your phone or tablet, head to Settings, and scroll down to About phone at the bottom. Scroll down to Build number and tap it 7 times. This unhides the developer options, which aren’t displayed in Android 4.2 and later. In the Developer options menu, enable USB debugging. You’ll need to do this even if you are running the preview version of Android L. And if you are, now skip to step 6.
Step 4. Download the Google USB driver from here here and extract the zip file somewhere. Step 5. With your Nexus connected via USB and powered on, go to the Control Panel and click Devices and Printers. You should see your device in the list. On our Windows 8 machine, it was listed as ‘MTP’ under Multimedia devices. Right-click on it, and choose properties. Click on the Hardware tab, then select the Nexus 5 in the list, and click Properties. Now update the driver, pointing Windows to the folder where you extracted the Google USB driver. Once done, it should report the device as Android Composite ADB interface. Plus, you should get a prompt on your device’s screen asking “Allow USB debugging?”. Tick Always allow from this computer and tap OK.
Step 6. Now, Power off your device, and leave it connected to your computer’s USB port. Now start it using the appropriate key combination to put it in “fastboot” mode. For the Nexus 5, that’s by holding down the volume up, volume down and power buttons simultaneously. You should see a screen like the one below. Press power and volume down on the Nexus 7. Alternatively, you can leave your device on and type adb reboot-bootloader to restart in fastboot mode.
Step 7. If the LOCK STATE says locked (which it should) then type ‘fastboot oem unlock’ at the command prompt, without the quotes, and press Enter. (If it’s still unlocked, skip to step 8). You’ll see a screen like the one below. To change from no to yes, use the volume rocker, and to select the option, press the power button. This WILL erase your device, so make sure you’ve backed everything up first.
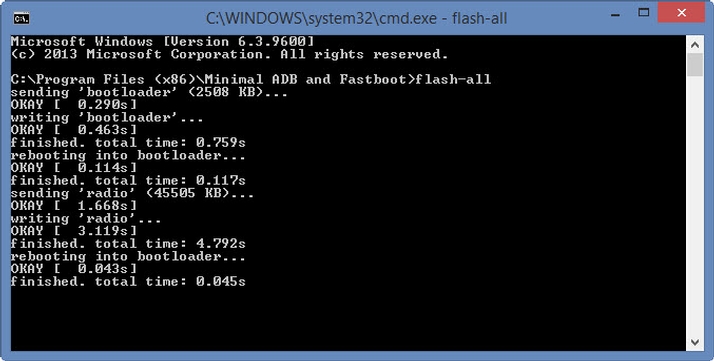
Step 8. With the bootloader unlocked, you can now install the Android Lollipop firmware. Simply type flash-all and the process will begin. You will see alternating downloading… writing…. erasing… on your device’s screen.
Step 9. When the process finished, you should lock the bootloader again for security. Start the device in fastboot mode (as in Step 6), and then type fastboot oem lock Locking the bootloader won’t wipe any data, but if you unlock it again, it will erase the device of all user data and settings.
How to uninstall Android Lollipop and return to factory settings
Reverting to the version of Android you had before installing Android L is pretty much the same process as you’ve just completed. Step 10. First, download the correct version of Android KitKat for your device from Google’s images page You can choose which version of KitKat you want. Step 11. Then, extract it as in Step 2 above. You’ll need to delete the Android L files from the c:Program Files (x86)Minimal ADB and Fastboot folder before copying the extracted files there. These are the files to remove (in case you forgot which were which).
Step 12. Repeat step 6 to 8, and you’ll have a box fresh Nexus 5 (or 7).
How to install Android L: Nexus 4 and Nexus 7 2012
Although Google has published the source code for Android L on many Nexus devices, the developer preview is only available for the Nexus 5 and 2013 edition of the Nexus 7. However, if you’re super keen, you can get Android L for your Nexus 4 and the original Nexus 7 from 2012. The developers over on XDA have managed to port Android L to both of the older devices. If you own a Nexus 4, check out this thread on getting the new Android and this thread if you have the original Nexus 7. Be warned that these are beta versions and as such many things are not working on a basic level and apps are likely to not work. A list of issues can be found on GitHub. Jim has been testing and reviewing products for over 20 years. His main beats include VPN services and antivirus. He also covers smart home tech, mesh Wi-Fi and electric bikes.